
Microsoft Teams is a persistent chat-based collaboration platform complete with document sharing, online meetings, and many more extremely useful features for business communications. Having an excellent team space is key to being able to make creative decision and communicate with one another.
We'll take a tour of the Teams user interface. When you run the desktop application, the first screen you see after you log in is shown below.
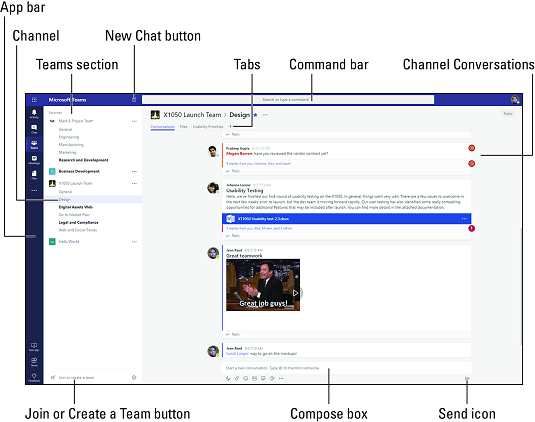
The Teams desktop user interface.
- App bar: Here you can navigate to the various sections in Teams. From the top, you’ll see the following icons:
- Activity is where you’ll find mentions, replies, and other notifications.
- Chat is where you’ll see your recent one-on-one or group chats and your Contacts list.
- Teams displays all the Teams you are a member of.
- Meetings is synched with your Outlook calendar and displays all your upcoming meetings.
- Files aggregates all the files from all the Teams you are a member of. It is also where you access your personal OneDrive for Business storage.
- […] includes links to apps that are tied to Teams and the channels within Teams.
- Store takes you to apps and services that can be integrated into Teams.
- Feedback takes you to the Microsoft Teams user voice page where you can leave feedback about the service.
- Teams section: Above, the Teams icon is selected in the App bar, so the list of the teams we are members of are displayed here.
- Channel: A dedicated section within a Team to organize conversations and tasks into specific topics or projects.
- Join or Create a Team button: Clicking this button takes you through the process of creating or joining a team. This button is only visible when the Teams icon is selected in the App bar.
- New Chat button: Clicking this button selects the Chat icon in the App bar and allows you to start a new chat with an individual or a group.
- Command bar: This bar at the top is used to query apps or perform a search in Teams.
- Tabs: Switch between different Teams pages with these tabs. Conversations and Files are automatically included; the + sign tab allows you to add shortcuts to content in Teams.
- Channel Conversations: This section displays all the conversations in the selected channel. Chats in Channel Conversations are persistent, so if you’ve been away, it’s easy to scroll through to get caught up when you get back. Chats can include visual indicators such as the @mention, which indicates that the chat specifically mentions a user, or a red bang to indicate high importance. Take note that chats are open by design so everyone in the team has visibility to the conversation to help speed up the decision-making process when needed.
- Compose box: This is where you can type a message to start a conversation. You can send a quick chat or expand the Compose box to access rich formatting tools.
- Send icon: When you’re ready to share your chat, click the Send icon to post your chat to the team.
Getting help from the Microsoft Teams Command bar
Teams is intuitive to use, but you if you need quick assistance, the Command bar is your one-stop destination for help. Of course, users of Teams can also reach IT support simply by sending an email to helpdesk@seacormarine.com. In Teams, you can search across conversations, users, files, and apps. For example, if you enter the word “launch” in the command bar, the left pane will display the search results grouped by Messages, People, and Files.
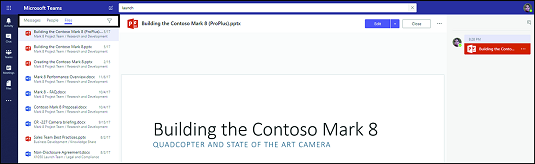
Command bar search results.
Collaborating in the Microsoft Teams Hub
Imagine the following scenario: Someone sends an email to three people asking for their input on something. Two of the recipients immediately respond. Recipient #3 replies to Recipient #2 but forgets to reply to all. Now Recipient #2 has information the others don’t have. Recipient #1 then forwards the email to yet another person (Recipient #4) who replies to all with his feedback, which doesn’t account for what’s already been discussed prior to him being involved. Pretty soon, everyone’s mailbox explodes with replies to replies and replies to all that the sender finally throws her hands up in frustration because now the conversation has gotten out of hand and he’s spending too much time getting everyone up to speed. On top of that, he now must consolidate all the feedback manually.
Teams makes email trees go away. In Teams, the sender can avoid the previous scenario by uploading the file into the Teams channel, @mention the people she needs feedback from, and start a conversation right from the document in Teams. This way, everyone sees everyone’s comments and edits. A new person joining the conversation can just scroll up to get up to speed and everyone is happy.
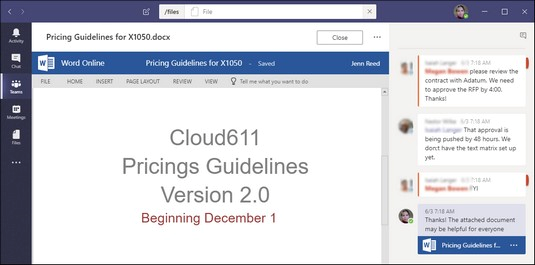
Starting a conversation about a document in Teams.
Chatting in Microsoft Teams
When a new member is added to a Team, that member automatically gets access to all previous conversations, files, and other types of information shared in the Team’s hub. This is especially helpful for onboarding a new team member to a project. There is no need to think about what files to forward to get the new member up to speed, since he or she can self-serve from the content available in the hub or simply ask for help from others through chat.
To start a chat, click on the Compose Box and start typing your message while in either the Activity, Chat, or Teams sections. When you’re done, click the Send icon to post your message. Depending on the culture of your team, you can spice up your chats with emojis, Giphys, or stickers. You’ll find a variety of options when you click these icons below the Compose Box.
Sometimes conversations in a Team can become noisy when there are many members talking about different topics. To help with that, take advantage of the threaded messages feature in Teams by replying directly to a specific message so the reply in in context with the original message.
Sharing Files in Microsoft Teams
When you create a Teams hub, a SharePoint site is automatically created in the backend, which in turn, creates a document library for each channel. Files uploaded in a Teams channel show up the Files tab and are stored in a SharePoint document library. In fact, you can click the ellipses next to the file name and then choose to open the file from its location in SharePoint.
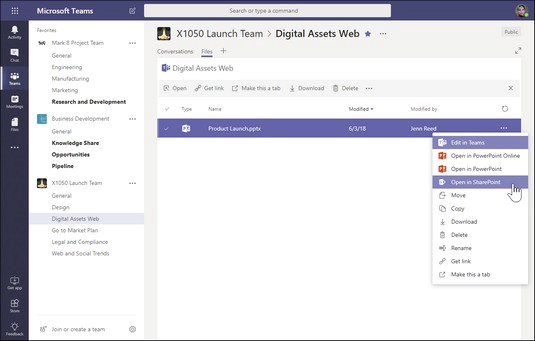
Opening a file in SharePoint from Teams.
To share a file in Teams:
- Select Teams from the App bar.
- Compose a message in the Compose box from a channel.
- Click the Attach icon (it looks like a paperclip) below the Compose box and select the source for the attachment you want to share.
- Select the file from the source and upload it.
The file you uploaded will now be embedded in the message.
- Click the Send icon (it looks like an airplane) to post your message.
The file you shared will also show up in the Files tab.
Alternatively, you can go directly to the Files tab and click the Upload button to upload a file. Once the file is uploaded, click the name of the file to open it. Once opened, you can start a conversation with others regarding the document.
Comments
0 comments
Please sign in to leave a comment.